


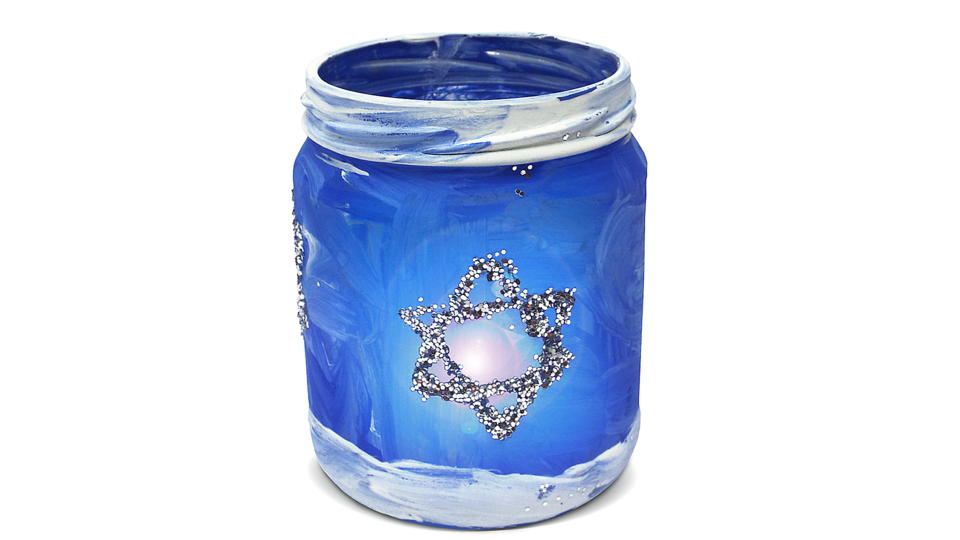
Star of David lantern
Create this decorative lantern table decoration for Hanukkah.
You'll Need
- Empty, washed jam or pickle jar
- Blue and white tempera paint
- Paint brush
- Plastic plates (for paint and glue)
- Liquid glue
- Toblerone chocolate box (triangular shaped)
- Silver glitter
Time
45 minutes
Learning Stages

This Star of David lantern is a great activity to do with your kids and it makes a sparkly Hanukah table decoration.
Setup
- Cover your child’s work surface with newspaper.
- Pour a small amount of both colors of paint on one of the plates. (For thinner, more transparent paint, add a little water to the paint.)
Assemble & decorate Hanukkah lantern
- Have your child paint the outside of the jar, using both the blue and white paints. Children love mixing the colors and you can tell them that adding white to a color creates a tint of that color. Encourage them to cover the entire outside of the jar with paint. (I added white around the base and rim of the jar for a border. )
- Let dry for at least 30 minutes, depending on the thickness of the paint.
- Open the Toblarone chocolate, saving the chocolate for later, (Yum!) and tear off the end, leaving an open, triangular shaped tube.
- Pour a small puddle of glue on the other plate and dip the end of the box in the glue. Press this gluey end onto the side of the jar to make a triangle shape. Depending on the age of your child, you may need to help them do this.
- Re-dip the box in the glue and turn it so the points alternate with the design already on the jar. In this way, you create a Star of David!
- Place your lantern in a medium size box and let your child shake glitter all over the gluey star design. (I have a box at school we call “The Glitter Box” just for this purpose. It keeps the glittery sparkles from going all over the place and the excess can be poured back into the glitter jar.)
- Carefully take the lantern out of the box and allow the glue to dry for at least an hour, probably more. If the glue is thick, you may want to lay it on its side so it doesn’t run down.
- When the glue is dry, place a tea light inside the lantern and light it for a sparkly Hanukah table decoration!
Note: If you have the time or inclination, you can use transparent glass paints for this project. On the plus side, these paints allow more light through, giving the lantern a better glow, but the challenge is that they take from 4-21 days to cure, depending on the brand.
More Like This

Holiday haiku
Use the short-form Japanese poem, haiku, to help kids master their syllables.
Reading & Writing

Holiday savvy
Make the most of the holiday season to teach kids about cultural diversity.
Creativity & Life Skills